
Directions
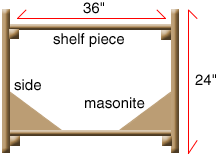
1. Cut the wood carefully. Mark your cut lines with a right angle measure.
2 shelf pieces (lxl2) 36 inches 4 shelf supports (lx2) 10 inches 2 triangles (Masonite) 9 x 6 inches |
 |
|
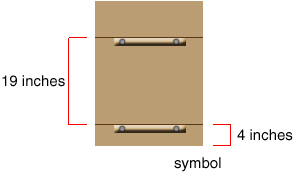
2. Sand all pieces smooth. 3. Mark the best sides of the wood for the sides that show. Then mark the most evenly cut edges as the bottom. 4. Measuring from the bottom and inside of the 2 foot pieces, mark a line at 4 and 19 inches on both pieces. 5. Glue and clamp the support 1 x 2s below the 4 and 19 inch lines. 6. Drill two holes for the screws in each board; put a little glue in each hole. |
 |
|
7. Drive the 1 1/4 inch wood screws. 8. Repeat the process on the other 2 foot board. 9. Clamp one 3 foot shelf to the two side pieces. 10. Drill two holes through the bottom shelf into the support on each side. Be careful not to hit the other screws. Put glue in the holes. 11. Drive the screws. 12. Clamp on the top shelf. Repeat the process to drill the holes and drive the screws. |
 |
|
13. Turn the shelf on its front. Position the triangles on the bottom shelf.
Hold them down and drill three holes. Put glue in the holes. 14. Drive 3 screws into each triangle. 15. Sand any rough spots. Sign and date your work. |
 |
A Home Learning Center
THE SHELF STORES TOYS
Why
*so the child can play often, alone or with mom
*so the child has a habit of getting the toy out, playing, and putting it
away
Where
*a shelf lets the child look (scan) for his choice *keeps the toys stored without mixing them up *in the places where adults also work
In What
*a container that holds all the pieces
*a container that is easy to carry
When to change toys
*change invites kids to play more
*change increases thinking skills
What to put on the shell… bins, boxes and trays of
*Art materials
*Toys to build hand and eye coordination (put together toys)
*Pretend toys
*Music toys *Puzzles
*Large Muscle toys
Book Shelf Materials List
|
|
|
|||||||||
| ||||||||||