
|
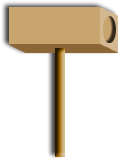
Directions: 1. Cut a 7 inch length of 1/2 inch dowel. 2. Cut a 3 inch piece of 2x2. 3. Sand both pieces smooth. 4. Drill a 1/2 inch hole into one side of the 2x2 about 1" deep. 5. Drill a shallow 1/4 to 1/2 inch deep hole in one face of the hammer for designs in the clay. Leave the other side a flat surface. 6. Coat the inside of the 1/2 inch hole with glue and insert the handle. Let it set over night. 7. Sign your work and date it. |
 |
Your CLAY TRAY
Cookie sheet, plasticene clay, the clay hammer and 2 tools
Why a cookie sheet? It gives a boundary to your child's play area. It says keep all the clay inside of the tray's brim. It is large enough to let the children have a play area and hold three tools.
Why plasticene clay? It is a non-toxic clay. It does not dry out if you do not put in a sealed container. It does get stiff but if you work it for 30 seconds, It will become soft again. It has strong colors so children should wash their hands after they play with it. (It can get in carpeting or furniture so use in the kitchen.)
Why the clay hammer? Pounding is fun for a child; this is a very normal activity and pounding clay is a great outlet for aggressive feelings. It also is easy for a young child to make a mark in the clay.
Why three tools? If you had too many tools on the tray, It would take up the play area. The clay wouldn't have any room. Then the children might play on a surface that they shouldn't.
Brainstorm some tools that would be fun to play with in the clay. Have a treasure hunt around the room to find interesting tools.
Why play with CLAY?
List some benefits to children
physically |
cognitively |
creatively |
| What ages and stages make | pancakes? snakes balls shapes letters and numbers people-type statues representational objects like animals, pots and pan, cars, etc. |
List the rules for your house around clay play.
1.
2.
3.
Clay Hammer Materials List
In one end of the mallet we drilled a hole. It makes impressions in the clay when a child pounds. Your group can make up other ideas. Or make a set of clay hammers with all different faces. For example, I drilled and glued in 3 very short 1/4" dowels in one face.
You might consider also supplying blocks of plasticene clay; they come in colors. I chose plasticine because it NEVER dries out when left on the tray uncovered. The program also supplied the trays to the families.
|
|
|
|||||||||
| ||||||||||