| You are here - OLRC | Home | Site Index | Contact Us |
|
||||

Title:
Materials:
Audience:
Setting:
Activity:
Provide students with the figures of differing sizes and about 20 of the smaller paperclips; have them determine how many paperclips it takes to go around each figure. Compare findings to verify that all students are measuring correctly. Make the connection that what they have measured is the perimeter of the figure.
Next, give learners about 10 jumbo paperclips and ask the following questions:
1.) Will it take the same number of the larger paperclips to make the perimeter of the figures as it did the smaller clips? (no)
2.) Will it take more or fewer of the larger clips? (fewer)
Tell students to prove their answer to question 2 by using Jumbo clips to measure the perimeter of one of the figures.
Then ask:
3.) Why did it take fewer large paperclips than smaller paperclips to make the perimeter of the figure? (allow all answers; verify the correct answer with the continuation of the exercise)
Show the class a well used pencil and an unsharpened pencil, then ask:
4.) Would it take more of the new pencil or more of the used pencil to measure the perimeter of the top of my desk? (more used pencil because it is smaller)
Repeat this using two sizes of other objects (straws, toothpicks, pens, craft sticks) and measure other objects in the room until the learners conclude that it always takes fewer larger units than smaller units to measure the same distance. Conclude by asking the same question about inches and feet; feet and yards; and any other standard units desired.
Evaluation:
Modification:
Title:
Materials:
Audience:
Setting:
Activity:
Distribute about 20 straws to each pair of students; ask them to use some of their straws to make a square. Walk around to ensure that all students are proceeding correctly. Then ask:
1.) How many straws did you use to make your square? (answers may vary)
Connect this to the fact that the number of straws used to make the square is the perimeter of the square. Next instruct learners to make a square with a perimeter of 8 straws; check that all have succeeded-. Then ask them to make a square with a perimeter of 10 straws. They will not be able to comply unless straws are cut which is not allowed. Ask:
2.) Why couldn't you make a square with a perimeter of 10? (accept all answers and verify the correct answer by continuing the activity)
Continue the activity by requesting that learners make squares with other perimeters, mixing in some that are not -possible. (4, 61 12, 15, 16, 18, 20) Learners should come to the conclusion that all possible perimeters are multiples of four. Introduce the formula for the perimeter of a square, P = 4s (perimeter equals four times the side of the square).
B. Perimeter of a rectangle
Ask students to make a rectangle using some of their straws. Then ask:
3.) How is the rectangle different than the squares you made? (it is longer one way than it is the other way)
Repeat the activity above Instructing students to make rectangles of various perimeters. The smallest perimeter using whole straws is six, and all perimeters will be multiples of two. Lead the students to this discovery through the construction of the rectangles.
Introduce the formula for the perimeter of a rectangle, P 21 + 2w (perimeter equals two times the length plus two times the width). It is because you always have to multiply the length and width times two that the perimeter is a multiple of two. (This Is true only when using whole units as dimensions.)
C. Perimeter of a triangle
Repeat the activity having the students construct triangles. Lead the students to discover that there is no requirement for the perimeter of a triangle except that there be only three sides. Introduce the formula for perimeter of a triangle, P = a + b + c (perimeter equals side a, plus side b, plus side c.)
Evaluation:
Modifications:
Title:
Materials:
Audience:
Setting:
Activity:
1.) How many quarters do you think would cover figure A? (accept all answers; verify correct answer as activity continues)
Next have learners actually cover figure A with the quarter size circles to verify correct number. Repeat with figures B and C, having learners first estimate how many before covering the area. Explain that the area is the covering of the surface of a figure. Then ask:
2.) How many of the one-inch squares do you think It would take to cover figure A? (accept all---answers; verify answer as activity continues; it will take the same number of squares as circles)
Have learners cover figure A with one-inch squares to verify the correct number. Repeat with figures B and C, estimating the number before covering figure. They should discover that the number of quarters is the same as the number of square inches.
Evaluation: This activity can help learners gain a reference for estimating square inches by visualizing quarters.
Modification: Have students estimate how many quarters would cover items on their desks or in the class. Intermediate to high level learners could perform the activity using figures D and E or with figures on Handout 2.
Title:
Materials:
Audience:
Setting:
Activity:
Have learners lay transparencies over figure A of Handout 1 and count the number of squares it takes to cover the area. Reinforce the fact that area is always measured in square units. Learners can then measure the area of figures B and C. More advanced learners can find the area of figures D and E (the triangle and circle). The transparencies can be written on with china marker's or overhead markers to help students count squares at outline the figures.
Let students use the transparencies to find the area of some items in the classroom such as book covers, window panes, table tops, etc.
Evaluation:
Modification:
On a clear shower curtain liner, have students make a square-foot grid using a T-square, tape measure, and permanent markers. Measure the area of large classroom surfaces available such as table tops, blackboards, walls, or floors. (This grid can later be used to teach latitude and longitude by numbering the lines.)
Title:
Materials:
Audience:
Activity:
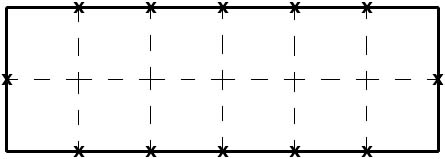
Ask students to measure each side of figure A and mark off each inch. Next have them connect the marks opposite each other. (You may have to show an example of this on the board. )
Example:

Then ask:
1.) How many squares are in figure A? (12)
2.) What was the area when you measured It with the transparency grid? (12 square units (or inches))
After naming the longer side the length and the shorter side the width, ask:
3.) How many inches did you mark off an the length (across the top) of figure A? (6)
4.) How many inches did you mark off on the width (along one side) of figure A? (2)
Instruct students to multiply the number of inches across the top of figure A by the number of inches along the side of figure A. Ask:
5.) What number do you get when you multiply these two numbers? (12)
6.) What conclusion can you make from this? (that to find area you can multiply the length of the rectangle by the width of the rectangle)
Repeat this process with figures B and C. You have Just proven the formula for the area of a rectangle, A = lw (area equals length times width).
Title:
Materials:
Audience:
Setting:
Activity:
Example:

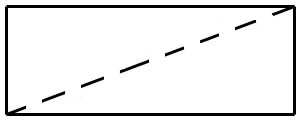
Tell learners to cut out figure B. When they have done this, have them cut on the diagonal line. Then ask:
1.) What do you have now that you have cut along the diagonal line? (two triangles)
2.) How do the triangles compare in size? (they are the same)
Lead students to see that they have cut the rectangle In half; therefore, the area of each triangle is half of the area of rectangle B by asking:
3.) What Is the area of one of the triangles? (6 square .inches)
Let students use transparencies to confirm the area of the triangle.
Going back to the uncut copy of Handout 1, have students rename the width the base (because the figure sits on it) and the length the height (because that is how tall the figure is). Ask:
4.) What number do you get if you multiply the base times the height? (12)
5.) How does this compare with the area of figure B? (it is the same)
6:) Why is It the same? (because the base and height are the same as the length and width, and area equals length times width)
7.) What is half of this area? (6 square inches)
8.) How does this compare with the area of one of the triangles that you made from figure B? (it is the same)
9.) Why? (because one triangle is half of the rectangle)
Introduce the formula for the area of a triangle, A = 1/2 bh (area equals half of the base times the height OR area equals one half times the base times the height).
Evaluation:
Modification:
Title:
Materials:
Audience:
Setting:
Activity:

Have students find the perimeter of their figure and fill in the appropriate numbers In the chart on Handout 5. At this point all areas and perimeters will be the same.
Ask students to make a figure with an area of three square Inches. This could provide some variety In the look of the figures and in the perimeters. However, they may all have the same results. Students then add the information to their chart.
Continue to increase the area of the figure you ask the students to make up to twelve square inches in area, having them record the information on their charts each time.
Conclude the activity by making a classroom chart showing all of the results from all of the learners' figures. It should then be very clear that the same area does not mean the same perimeter.
Evaluation: This activity can inspire a lot of discussion about the shapes that can produce the same area. It also very effectively makes the point that same area does not mean same perimeter.
Modification: You can use a combination of squares and rectangle (doubles or triples of the squares used) and even right triangles for more advanced students.
This is also a great way to explore the multiplication facts. If you do not allow any shapes other than squares and rectangles, the lengths and widths will be the factors of the areas In every case.
Title:
Materials:
Audience:
Setting:
Activity:
Instruct each learner to construct as many figures as possible (3) by placing matching sides of the triangles together. They should draw a sketch of each figure and find Its perimeter; then compare the perimeters. Be sure they realize that the area of every figure is the same because that one piece of paper was used.
The outcome should be that while the areas are the same, the perimeters are different.
Evaluation:

What is the least number of rolls of wallpaper you will need to wallpaper the wall shown above? The wallpaper is sold in rolls 24 inches by 25 feet. You do not need to match a pattern but all seams must be up and down.
Title:
Objective:
Materials:
Audience targeted level:
Type of setting:
Time required:
Activity:
Questions:
Evaluation:
Recommended Resources:
Modifications:
Title:
Objective:
Materials:
Audience targeted/level:
Type of setting:
Time required:
Activity:
To measure the group who has the least waste, introduce the area formula and compare the waste of the groups.
Prizes should be given to the whole class as well as something extra for the winners.
Evaluation:
Modifications:
Title: Tangram Unit Area
Objective:
Materials:
Audience targeted/level:
Type of setting:
Time required:
Activity:
Evaluation:
Recommended Resources:
Title:
Objective:
Materials:
Audience targeted/level:
Time required:
Activity:
Evaluation:
Recommended Resources:
Modifications:
Title:
Objective:
Materials:
Audience targeted/level:
Type of setting:
Time required:
Activity:
Introduce the concept of supplementary angles. Find two pattern block shapes that will make supplementary angles when their comers are matched up. How many combinations can you find? (9)
Introduce the concept of vertical angles. Arrange four trapezoids from the pattern block set to show two intersecting lines. (See drawing 1) Use two green triangles lined up over the acute vertical angles to show they have equal measures. (See drawing 2) Two blue parallelograms lined up over the obtuse angles will demonstrate the equal measures of those angles.
Introduce the concept of parallel lines cut by a transversal. If another row of trapezoids is added to the previous drawing, a set of parallel lines cut by a transversal will be created. Using the green triangles and blue parallelograms to "measure" again, these relationships can be explored.
Evaluation:
Recommended Resources:
Modifications:
Title:
Objective:
Materials:
Audience targeted/level:
Type of setting:
Time required:
Activity:
Discuss the shape that the three angles form. What does this mean? What can be concluded about the sum of the angles in different shaped triangles?
Evaluation:
Title:
Materials:
Audience targeted/level:
Type of setting:
Time required:
Activity:
Evaluation:
Modifications:
|
|
|
|||||||||
|
| ||||||||||